Mystery Readers

Happy Sunday Everyone!


Amanda here!  I just wanted to start your week with one of my FAVORITE additions to my classroom, MYSTERY READERS!  Having mystery readers come into the classroom was without a doubt a favorite for all. 


Now, having mystery readers isn’t a new concept by any means but I wanted to make sure it was as meaningful as possible. This lead me to revamp the idea to include having parents choose from a list of books that addressed character building, and life lessons. I also asked them to write a letter to the class inside the front cover as a reminder of what they learned from the book. 

After we finish with a Mystery Reader, I take a picture of them with their child (that we hang up), and we place their book in a special book bin in our library.  These by far are the most popular books for the kiddos.  It warms my heart that my students are being reminded of so many important  lessons each time they open them up.


Now the logistics is something I had to figure out, but I'll break down the way I do it.  


      1. Read through the list of books.  If there are some that you already have, don’t feel are appropriate, or simply don’t want on the list….delete them. 

      2. Print a packet for each parent with the letter and book descriptions.

      3. Put each packet in a manila envelope, and glue a “TOP SECRET” label to the front of each one and give them to families.


      4. Use the website, Sign-up Genius, and create a sign up for the books  available so that you don’t have more than one person reading the same book.


     5. After you have parent’s signed up, send a sign up genius to those parents with dates/times.
      
     6. A week before a parent comes, have them send you 5 clues you can read to the class before they walk in.


This is what the envelopes look like with the labels on them.  This was also a book that the kids LOVED.  


Here is an example of a letter a parent wrote inside their book.  It's so special for the kids to look back on throughout the year.


Want a way to get started?  We will have you all set up with this product from our TPT store!


I hope you all can find the joy with your students and families that I did through this program.  We'd love to hear your thoughts and ideas as well!

:) Amanda

Classroom Library


Hello bookworms, Amanda here!


Today I’m so excited to talk to you about the heart of our classroom...the library!  This library was my
giant undertaking a few summers ago. For the first week of summer I dedicated my days to
re-organizing this massive section of our classroom.  There are so many ways that this can be done,
but I’ll share what worked for me!


Last spring a group of us teachers did our own book study with the book “Reading in the Wild” by
Donalyn Miller.   This really gave me insight on how I wanted to go about not only teaching reading, but
also organizing.  In this book, Donalyn Miller gave some guidelines of how to decide what books to keep,
and which to part with.  I then set forth on my quest to sift through the thousands of books I had. I ended
up getting rid of about 20 bins of books in this process and offering them to new teachers in the building.  
Although 20 bins of books sounds like a lot, my library didn’t have any less “bins”. I found that the bins
were just thinned out and much more manageable.


After the purging of books, it was time or decide how I wanted them organized.  I decided to get these
adorable and clean labels from Maria Gavin. I bought the black set, but there is also a white set if that
better suits your classroom decor.  For bins I used simple, white, Sterilite bins for themes with many
books, and these book bins from ReallyGoodStuff for themes with less books.


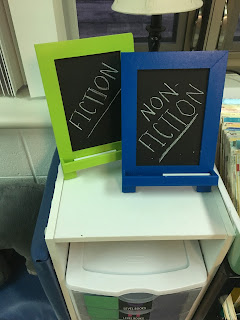
My library is in a corner of my room so I divided it into three sections.  On the left were all of the fiction
books. I have them sorted by theme, as well as some favorite fiction author bins.  What I did with these
bins is I took the labels I bought and backed it with green construction paper to wrap around the bin.  
This way some of my struggling and more visual learners could associate green with fiction. In the
middle I have one taller shelving unit that has all of my chapter books that are mostly sorted into series.
The right side mirrors the left, but instead of fiction, they are all non-fiction books and are backed with
blue rather than green.  Now there are some themes, such as transportation, that have both fiction and
non-fiction books. These bins I backed with both colors to help students understand. **Learn from my failure! I used construction paper for these labels originally and due to the windows in my room, they faded horribly. I'm currently remaking them with fadeless paper. :(


As far as how we use the library, the list goes on!  These are a few ways:
1. We have a First Grade Book Club.  We will share more about this in a future post, but the theme
of our book club is Dr. Seuss.  Each summer we keep an eye out at Target for their Dr. Seuss
dollar section items to come in. They have bags that we buy and label with the students’ names
for them to use as their “book bag” throughout the year (great use for the Target gift cards we
receive at the end of the year).  Students check out a book for home daily, or as they finish their
current book.

2. As students come in each morning they go through their check in routine and morning work.  
5 students each day have their name on the smart board reminding them that it is their day to
“shop” for books.  Rather than do their morning work on that day, they get their book boxes and
switch out their books.

3. Mystery Readers!  This year we started this fun tradition and it all takes place in our wonderful
library.  Mystery readers is not a new concept, but our spin on it is! Look for a future post on this
topic, you’ll love it!

4. General read alouds and read-to- self time.  This is a favorite cozy spot for everyone!

As I'm switching up the decor of my classroom this year, the concept of this organization will stay the same, it just may look a little different.

How do you all organize your library?! We'd love to hear about it!


Flexible Seating in the Classroom - Introduction to Students

Flexible Seating in the Classroom - Introduction to Students


Hello again!


We’ve been going through each phase of switching over to a flexible/alternative seating classroom.  
If you’ve missed any of those posts, click below to catch up!


Today I’m going to explain how I introduce this new style of classroom arrangement and management
to my students.  When my students came in for the first time, it was funny to see them look so confused
as they noticed there were no name tags on specific spots.  I then explain that they will get to choose
their own seat when they find out what works best for their body! For the first week I do assign spots.
I have their names on name tags that I simply set on the desks before they’d arrive in the morning.  I
explain to them that I am doing this to make sure that everyone gets to try out all of the options. I hand
each child a check off sheet that has a chart on it. The chart has a column that shows a picture of each
seating option, as well as a column with “This is a good fit for my body”, “This is not a good fit for my
body”, or “I’m not sure yet”.   We would pause twice a day to sit and discuss as a class, sharing students
outlooks on good fits, and not good fits and how their body was telling them that.


Through this discussion, it’s really helping students to take ownership of their own self-awareness and
learning.  Helping them to further understand and accept that no two people’s bodies are the same is a
vital part of our classroom community.  This all is also giving them the opportunity to build their ability to
think flexibly. Flexible thinking is an important building block to future problem solving and decision
making.  It is also letting the students know that I trust them to make the right choices for them and they
appreciate that trust and responsibility.


Initially for classroom management, I had on the board 3 columns.  One said “Student Choice” and had
all of the student numbers under it.  The second said “First Notice”, and the third said “Teacher Choice”.
I told the students that they all start in “Student Choice” but if they are not making responsible choices in
their seat, I will ask them to move their number to “First Notice”.  If it continues, it would get moved to
“Teacher’s Choice” and then I’d choose where they’d sit. Although this was an easy system, I ended up
taking it down due to lack of need. I really never had a student get to “Teacher’s Choice” because the
students didn’t want to lose the responsibility of making their own choice.  Now I can just simply tell them
that they have a warning verbally and they change their behavior without having to physically move their
number.


For my students with more significant needs, I sat down with my special education teacher to discuss
what would be best for them.  For my students with more severe autism we find that it is beneficial to
have them at one consistent spot that is “theirs”. For some of my students with issues focusing or
processing, I talk with them and “guide them” into understanding that certain spots or seats are best for
them.  You’ll decide what’s best for your students in this case, and this is going to be different from year
to year.


I hope this helped your insight! Join us next week for my favorite part of my classroom….the library!  
Find out how I organize it and how we use it each day.

Classroom - Organizing Supplies


Good Morning!

Today I’m going to let you in on my battle of organizing supplies.  I don’t know about you all, but between Lucy and I, I think we’ve tried every way possible to organize our student’s supplies. Before I flipped my classroom, my students had their own supplies in their own desks.  They had a pencil box for pencils, scissors, and erasers and a ziploc storage bag for the rest of their art supplies.  I could not swallow the idea of having community supplies so I had to figure out how to keep them individualized for now.

In the process of flipping the room, I put their folders and notebooks and in a numbered book box much like these that you can find on Really Good Stuff.  Their pencil box and art supply bag, Lucy and I put on the top shelf of their locker.  The idea was that students would simply bring their supplies in with them in the morning and put them on their chosen desk.  This all worked fine for the remainder of the year, but I knew this had to change.  The ziploc bags would rip open and it was  a lot of clutter in their work space.  

When the year finished, my current teaching partner knew she was going to flip her classroom as well for the following year.  We decided to sit down and figure out how exactly we wanted to organize things, and what we needed in order to do it.  With the plan we came up with we probably should have bought stock in Sterilite, because boy did we order A LOT!

First, I gave into community supplies.  It was a big hurdle for me to jump over, but truly is the easiest and most clutter-free way to go.  With that being said, we “modernized” it a bit.  We ordered a bunch of Sterilite Small 5 Drawer Units from Wal-mart for their supplies.  This way we could use visual labels for students that needed them, and the supplies were stored and enclosed so they’d stay  cleaner and less abused.  We also purchased a few extra for students we knew we’d get that tend to put things in their mouth. This way they would have their own that looked like everyone else’s, but wouldn’t spread the germs.


I must say, I really enjoy this way of organizing.  I also stalked Michaels for weeks waiting for this huge 8-drawer storage to go on sale.  We call this the “extras bin”.  If a student needs a new red marker because the one in their drawer is dead, they simply throw it away and get one from the extras bin to add to their supplies.  It’s nice to not have to worry about the up keep, the students do.


As for their folders and notebooks, we purchased Sterilite Wide 3 Drawer Units, again from Wal-mart. We numbered the drawers so students would know which was theirs, and it holds everything they need.  Binders fit with it all, but was a tight squeeze, so we simply stacked them next to the drawers.  

The students’ book boxes were also from Wal-mart.  We purchased Sterilite 3-Drawer Desktop Units.  Students just pull out their entire drawer when it comes time to use them.  My students choose 5-6 books at a time, along with whatever I’ve given them from mini lessons and they all fit surprisingly well.  For the large books that do not fit, students know to simply set it on top of their drawer unit.  

I’m really happy with the ease of the organization so far this year and it was worth the effort and money to just get what we needed to best accommodate our students and space.


Next week we will jump into how we introduce the students to this new style of seating and classroom management.  Have a wonderful week!

The Continuation of Flexible/Alternate Seating

Welcome back everyone!  


As promised, I am going to bring you through the rest of my journey to having a flexible/alternative seating classroom.  If you didn’t get a chance to read where the journey started last week, you can click here to read about it.  


Last week I raved about the success I had with getting Hokki Stools donated through DonorsChoose, and the surprising ease I had with incorporating them into my classroom.  Through this success, I read more and more about what else I could do in my classroom, although we were already in the second semester.  I was all over the internet and Pinterest looking at my dream classrooms and reading about how they went about it.  Bringing in Hokki Stools was the easy part.  It didn’t change the layout of my classroom, didn’t change where the kids sat or their day to day routine.  To fully flip my classroom would change all of that.  


To be honest I was nervous.  Could my 6 year olds handle choosing their own spots each day?  Could I give up enough control to allow them to do this?  Where were they going to keep their supplies if they had no desk?   What do I do with all of their current desks and chairs?  Well, impulsive me had to dive in head first and figure it out as I went.  


The last day before spring break I had Lucy come after school.  I had been staring at my classroom for weeks trying to figure out how else I could arrange it to make this work and I needed a fresh pair of eyes.  Lucy came in and just like the partners in crime we were, we just went to work.  No desks? Let’s try it!  We stacked them all out in the hallway to experiment.  Now we needed tables.  Our building has some extra classrooms with extra furniture in them.  We scoped out any room that may have something we could use and came up with a plan.  We gathered the furniture we could and I wrote down what we needed.


The plan was to have options for a variety of sensory opportunities. I should note that I am very fortunate to be in a building with an incredibly supportive administrator and custodian.  They know of my knowledgeably impulsive ways, and laugh alongside me as I pursue them.  You know your own building and situations so you may need to consult with them first.  My custodian was kind enough to find somewhere to go with my desks and chairs, but that may not be an option for everyone.

Now for the sensory opportunities.  I found 2 long rectangular tables. One of them I had my custodian lower so that one side could have cushions/pillows on the floor to sit on, while the other side had Core disks that students could sit on. The second one I left at standard height and I bought camping chairs for it.  I had two circle tables that I used for Hokki Stools and standard chairs.  Finally I kept a smaller rectangular table that I had my custodian raise so that students could stand and use them.  I also added in a small coffee table with 2 papasan chairs.


Most everything I bought was from Wal-mart, due to the fact that I flipped the classroom in such a short amount of time.  This year it has evolved a bit.  The standing table is now 2 cafe tables and I have tall stools students can also use there.  I also have 2 Runtz ball chairs that the students love.  This process was not cheap and was time consuming, but I love how it turned out!  


Next week I’ll let you know my challenge of organizing supplies.  See you next Thursday!  

Alternative/ Flexible Seating Classroom - The Beginning

Alternative/ Flexible Seating Classroom


Hi Everyone, Amanda here!  I wanted to invite you all to take a glimpse of my classroom and my philosophy behind the set up.  We all know children are active and the higher demands in the classroom don’t help their little body’s need for movement.  I was noticing so many of my kiddos that were doing everything in their power to focus on their tasks at hand, but for some it was simply outside of their realm of ability.  

This lead me to reading about flexible seating and alternative seating in the classroom.  The whole idea intrigued me.  What really stuck with me was the following imagery:
Imagine that active kiddo in your class, we all have someone that comes to mind!   We teach
them that they need to sit “criss-cross applesauce” on the carpet, or on their bottoms in a
standard chair to show their are paying attention.  Their eyes should be on the speaker if
they are being a “good listener”.  That child wants to follow directions, that child wants praise
and to show you they are listening, so they do all of those things.  That child is now using all
of the focus they have in order to do those things because it does not come naturally and
easily to them.  In doing this, they are not giving you their full attention, they are not fully
engaged and listening, and it’s not their fault!  By allowing their bodies to have the natural
movement it needs, we are allowing that child to now focus on the task at hand.


We don’t expect all students to learn content in the same way, so why would we think they all physically learn in the same ways?  This thought led me to write a grant for DonorsChoose for 6 Hokki Stools to incorporate into my room.  I was shocked when my friends, family, and student families funded it in less than 24 hours.  That alone inspired me and reinforced the great need for these items, as well as the overwhelming support behind taking this leap.  


When we received the Hokki Stools my kiddos were so excited!  Before handing them out to students, we sat down and discussed some rules.  The rules we put in place were:
  1. Sit on your bottom.
  2. Be in control of your body.
  3. Take care of our stools - no picking at the seats.
  4. Some bodies need them and some do not. Either way is OKAY!


The biggest rule that we discussed was the last one.  These stools lead into a conversation about how our bodies are different and how some of them may try the Hokki Stool and discover it is very helpful, but some will find it is harder for them to focus and learn while moving, and that is OKAY.  We discussed how no one, not even a teacher will be able to tell them what is best for their body, it is a special responsibility that they will get to have.  


I had 6 Hokki Stools so I chose 6 students to try them out for the morning.  I purposely chose 3 that I felt would benefit from them, and 3 that may not like them.  This worked out well as one of my students lasted about 15 minutes on the stool and I could see he was uncomfortable.  I asked him what he thought of the Hokki Stool and he said, “I don’t think this is good for me, can I get a chair?”  I praised him for recognizing this was not “just right” for his body and brought him a chair.  Before lunch we sat as a class and asked the chosen students to reflect on what they thought and why. I chose 6 new students to use them for the afternoon and we discussed again before students went home.  These discussions helped students to know what kind of “signs” their body may give them as to if the Hokki Stools were the right seat for them.  


Overall I was incredibly impressed how easily these stools were incorporated into our classroom.  The students used them so naturally and took care of them appropriately.  Some of my kiddos that I didn’t think would need them, surprised me by the amount of movement they had while using them.  It just proved how much responsibility the students should have over their own bodies, because you can’t lock step everyone.  This successful experience only heightened my interest in the topic and persuaded me to dive head first into turning my whole classroom into a flexible/alternative seating classroom.

I’ll let you know more about that next week!  Can’t wait to have you all back!

Insect Investigation Research Unit


Happy Friday Everyone!

Like we've mentioned, we are starting to get the hang of this creating thing! Hopefully you were able to take a look at our FREE Science Notebook resource. We are continuing our trek forward and officially have our first paid product, and we are so proud!  We can't believe the growth we have even noticed between our first product and this one. 

At the end of each year, our students put on a huge play for the school and families.  To go along with the play, students do a non-fiction research project on the topic of the play to make it a culmination of our literacy standards. This year we are doing a play called "Bugz", and the students are doing their projects on the insect of their choice.  Check out the journal we made to help guide them through this process!

This resource is meant to be a guide to note-taking as students research their chosen insect. It can be used individually or in a group project setting. At the end of this product, you will see that there are accommodations for students that have alternative needs (ex: unable to write). They will be able to glue on the corresponding picture and color it. There is also a breakdown of vocabulary for students that need review or are English Language Learners. We included both colored, as well as black and white versions of every page. 


Insects not a topic you can use?  Be on the lookout for more research topics coming soon by following this blog!  Want to make sure we create a specific topic you need?  Shoot us a message and we are happy to make that happen for you!


Have a wonderful day!
Lucy and Amanda